This post may contain affiliate links. If you use these links to buy something we earn a commission at no extra cost to you. Powerful Mothering is supported by its audience, thankyou!
Yesterday we had a lovely play date with a friend and her 2 year old daughter. I decided we would make some homemade finger paint and let the girls get a bit creative.
I am rather pleased at the colorfulness of our homemade finger paint!
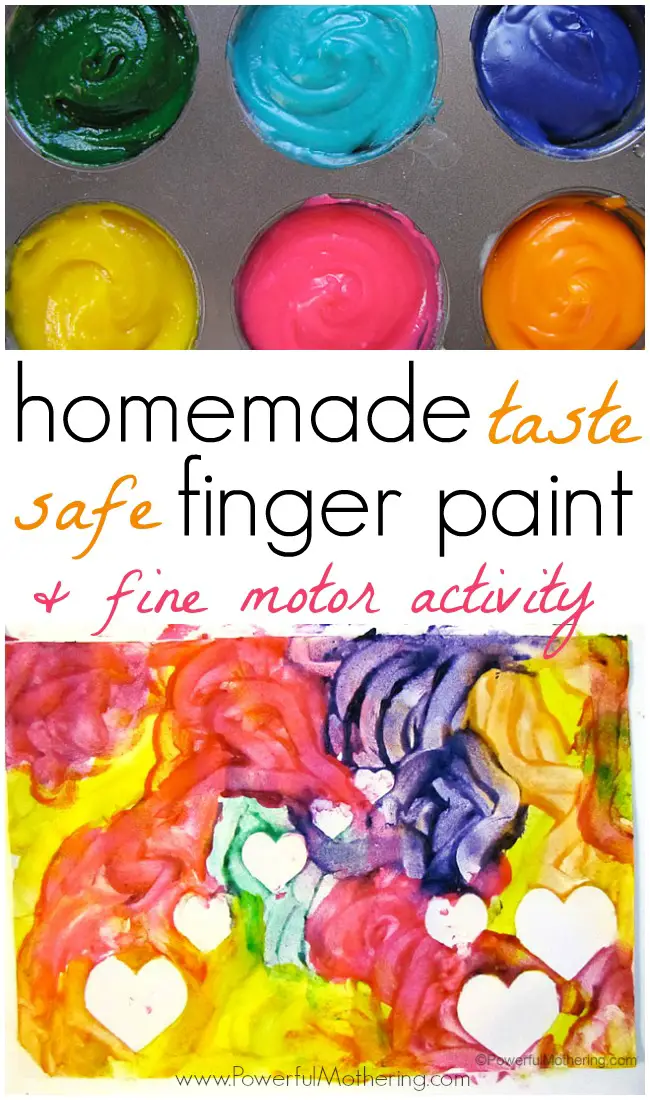
How to make homemade finger paint.
You will need,
- 2 cups of flour
- 2 teaspoons of salt
- 4 1/2 cups of water
- a pot & whisk
- coloring of choice (the ones I used are these neon gel colors)
Add the 4 and half cups of water to your pot as well as the salt. Set the stove plate to medium heat. Measure out your flour and slowly add it while mixing it in with a whisk to make sure there are no lumps.
Once you start to feel that the mixture is thickening dial down the heat to low and continue to stir with the whisk until you get the right consistency for your homemade finger paint.
This kind of reminds me of a porridge.

Scoop out a few spoons and add to containers so that you can color the homemade finger paint for use. I used a large muffin tray.
Add 2 drops of coloring and mix. Add more if you want deeper colors. Stir well.
Next, setup the area for finger painting!
I added a fine motor twist to this activity by adding foam stickers. I also taped each sheet of construction paper down for 2 reasons. Firstly to keep the paper in place when the little ones were painting and for when the art work dries as the drying tends to pull the paper up at the edges. 
Enter fine motor activity! Peel those foam stickers and stick them to your paper! Unfortunately the letters I had were rather hard to peel but the fish, hearts, bunnies and farm animals were good for my older preschooler to peel off. For the 2 year old I peeled her stickers for her and handed her the stickers so that she could stick them on the paper herself.
Once the sticking was done we dove into the homemade finger paint!
I was rather excited about making a heart finger paint master piece. I always find painting and crafting with the kids so much fun!
The 2 year olds tried out the homemade finger paint and after a bit of smearing on the paper decided that paint brushes would be the way to go. Usually my 2 year old cant wait to smear stuff and dig into anything sensory!
The pictures still came out beautifully though!
Even though they didnt cover the entire page which would have meant we could peel the stickers off to leave white silhouettes I think the pictures are still rather pretty.
AND the homemade finger paint muffin tray was looking gorgeous afterwards too! I just LOVE the color combos.
The heart art was rather stunning.
Once dry I carefully peeled off the foam stickers to reveal the master piece. I particularly like how the finger trails can still be seen in the homemade finger paint and that art dries in a 3D kind of way
Pin this homemade finger paint recipe for later!
This easy homemade finger paint is taste safe for babies, toddlers and any little one that still likes to taste stuff!
Are you looking for more awesome fine motor activities? Take a look what my co-hosts are up to this week!
- Dot Marker Alphabet Cards from Craftulate

- Construction Pom Pom Pick-Up & Sort Game from Stir the Wonder
- Eye Dropper Fine Motor Activities from Little Bins For Little Hands
- Pom Pom Fish Painting from House of Burke
- Fine Motor Mirror Box Play from Still Playing School
Have an under 2 year old? Check out this awesome ebook!



Amelia says
It might be good to mention that food coloring stains fingers 🤣
Samantha says
Such a great idea! We tried it out and the consistency was perfect. It was a great activity for a cold rainy day.
Diana says
Thanks for this recipe! It was just what I was looking for: easy to make and totally edible! We added sprinkles, cereal, and chia seeds for texture and the result was definitely a new experience for my toddlers! I’m going to include a link to this recipe from my post on our textured finger painting.
Nicolette Roux says
Pleasure! AND they came out great too! Was just over there checking it out 😀 Very nice idea to mix it up.
Nikki says
Love this and immediately thought adding taste to sensory time with texture was great! Try adding a different flavor extract to each paint.
kerry says
Can you keeps these for keepsakes?
Nicolette Roux says
I think you could! Just add a teaspoon of cream of tartar so that it doesnt mold when you make it.
Sabrina says
Will it stain clothing, in my case I actually want it to because I want to have my baby crawl and walk on a sheet to get the prints and be able to wash it so we can keep forever?
Thanks!
Nicolette Roux says
if you add MORE food clothing it will stain, then after the prints are on it let it dry and drab with some vinegar to see if it will help it set. I would try this on a sample cloth first though.
Sheri says
This is my second time using this recipe and I absolutely love it!! Thank you so much for this great memory with my baby boy (16 months), and fun gifts for grandparents & Aunts!
Nicolette Roux says
Thank you for sharing! I love to hear how the recipes are being used and that they are enjoyed! <3
The Little Tourist says
I love the colors you chose for the paints. So fun!
Tara says
I have celiac disease, can I use gluten free flour instead?
Nicolette Roux says
It should be fine. Try use less water at first and add as you go till it gets the right consistency.
Yana says
My kiddos loved this recipe with the koolaid to make the color and make it smell good- Love this recipe! So easy and makes a good amount! THANKS!
Nicolette Roux says
AWESOME!!
Yana says
I am going to try this today but to color it I am going to use koolaid packets to hopefully make it scented as we are talking about the 5 senses right now.
Kelsey says
Would this paint work on a canvas instead of paper? And would it last, and not attract bugs?
Nicolette Roux says
perhaps if you added some salt that would deter the mold. I am not sure. I have never tried this! 😀
Caitlin Gunderson says
I am just curious… do you know approximately how much paint this provides… like how many kids could use this recipe for paint. I am going overseas and want to use this diy paint recipe but am unsure how much I would need to make for all the children. Also, how long did it take to make? Did you have to cool it before the kids used it? Can this paint be stored away and used the next day or is this a recipe that can only be used for one time and then have to remake another batch for the next time? Thanks!
Nicolette Roux says
My recipe was used by 4 kids with lots extra so I would guess it would be perfect for around 6-8 kids. 10 mins to make. cool until it is safe to handle. I think next day use would be fine stored in airtight container so it does not dry out. anything over 2 days it won’t be very nice.
Michelle says
I just made this but had to add two extra cups of water for some reason, possibly because I boiled the water first, (I admit I just skimmed over the instructions!) it turned out great though! I used my electric hand mixer instead of a wisk to make the job easier.
Nicolette Roux says
yes, boiling would make the flour pull more of the water. 😀 Glad it worked out and you were able to have fun! <3
Lizaan says
Hi.. I just made this… Cant wait for my 2 year old to try it out. Tell me… can the left over paint be stored and for how long…
Thank you for making the average mom look so creative..he he he…
Nicolette Roux says
Thank you! Our paint lasted a week (2 weekends) Covered well in the fridge.
Sowmia says
I was wondering where you got the cool white trays that you taped the construction paper to?
Nicolette Roux says
Oh these are just from the plastic store. Simple tray
RoseAnne says
Love this idea can’t wait to try it. Could you email me where you got your trays from.
Nicolette Roux says
They are plain white plastic trays. Nothing special about them 😀
JDaniel4's Mom says
What a fun way to paint! We will have to try it.
Georgina @ Craftulate says
We love sticker resist art! These paintings turned out so well!